Introduction to Growing Kale
Kale has garnered significant attention in recent years, emerging as a quintessential superfood, revered for its substantial nutritional benefits. Packed with essential vitamins such as A, C, and K, kale also boasts high levels of antioxidants, fiber, and iron, making it a valuable addition to any diet. With its versatility and robust nutrient profile, it’s no wonder health enthusiasts and chefs alike celebrate this leafy green. Home gardeners, too, are increasingly inclined to grow kale, drawn by its ease of cultivation and the satisfaction of having a fresh, home-grown source of nutrients.
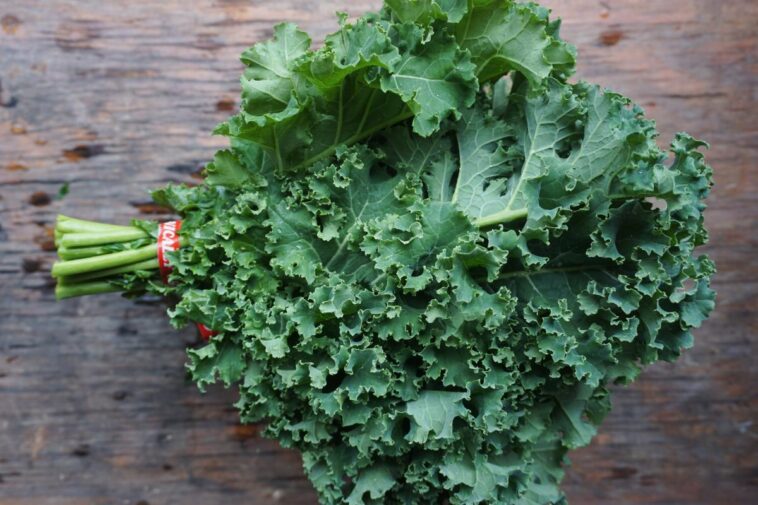
Growing kale at home also allows for a delightful exploration of the leafy green’s many varieties. While indeed there are numerous types of kale, three primary varieties tend to captivate gardeners: curly kale, dinosaur kale, and Russian kale. Curly kale, perhaps the most commonly recognized type, features tightly ruffled leaves that are dark green and sturdy. Its slightly bitter yet peppery taste makes it a popular choice in salads and smoothies. Dinosaur kale, known scientifically as Lacinato kale, is easily distinguishable by its long, dark blue-green leaves with a leathery texture. This variety, also dubbed Tuscan kale, offers a sweeter and milder flavor, well-suited to sautés and soups. Lastly, Russian kale, with its fringed leaves that exhibit a reddish-purple hue, brings a slightly nutty aroma and an attractive visual appeal to any culinary creation.
The rising popularity of kale owes itself not only to its health benefits but also to the relative simplicity of growing it. From amateur gardeners to seasoned horticulturists, cultivating kale at home promises not just a prolific yield of this nutritional powerhouse but also an engaging gardening experience. Whether you aim to incorporate more greens into your diet or thrive on the joys of home gardening, growing kale the right way can be both rewarding and immensely satisfying.
Choosing the Right Variety
When embarking on the journey to grow kale, selecting the right variety is a critical first step. There are several varieties of kale, each with distinct characteristics, flavors, and growth requisites. Some of the most popular varieties include Curly Kale, Dinosaur Kale, Red Russian Kale, and Ornamental Kale. Curly Kale is known for its frilly leaves and slightly bitter taste. It’s a cold-hardy variety, making it well-suited for cooler climates.
Dinosaur Kale, also known as Lacinato or Tuscan Kale, boasts dark green, bumpy leaves and a sweeter, milder flavor. This variety thrives in warmer climates compared to Curly Kale, though it can also tolerate cooler temperatures. Red Russian Kale features flat, serrated leaves with purple veins and a tender texture. It’s best grown in slightly cooler climates but can adapt to a range of conditions.
Ornamental Kale, while primarily used for decorative purposes, is also edible. It showcases vibrant, colorful leaves, providing not just a culinary benefit but also adding aesthetic appeal to your garden. This type of kale requires a moderate climate for optimal growth.
When choosing the right variety of kale, consider your local climate conditions. For cooler climates, Curly Kale and Red Russian Kale are excellent choices due to their frost tolerance. In contrast, Dinosaur Kale can better withstand warmer climates while still enduring some cooler weather. Personal taste preferences also play a role; for a sweeter flavor, Dinosaur Kale is preferable, while Curly Kale offers a more robust taste.
Additionally, soil type is a determining factor. Kale grows best in well-drained, fertile soil with a pH between 6.0 and 7.0. While all kale varieties enjoy these conditions, tailoring your soil preparation to the specific variety will enhance growth and yield. For instance, Dinosaur Kale may benefit more from slightly higher temperatures and consistent moisture compared to other varieties.
Considering growth habits, Curly Kale and Dinosaur Kale typically exhibit robust growth and can produce a steady yield throughout the growing season. Ornamental Kale, while yielding less, makes up for it with its visual charm. Choosing the right kale variety involves balancing climate, soil conditions, growth habits, and personal taste to ensure a bountiful and satisfying harvest.
Preparing the Soil
Growing healthy kale begins with understanding and preparing the ideal soil conditions. Kale thrives best in soil with a pH range of 6.0 to 7.5. Conducting a soil pH test is an essential first step. This can be achieved using a home testing kit or by sending a sample to a local extension office for more precise results. Adjustments can be made to tweak the soil pH: for instance, adding lime can raise the pH, while sulfur can lower it.
Equally important is enriching the soil with organic matter. This not only provides essential nutrients but also improves soil structure and promotes better water retention. Incorporating compost or well-aged manure into the soil can significantly enhance fertility. A generous application worked into the top 6 to 8 inches of soil will lay the groundwork for robust kale growth. Organic matter also attracts beneficial microorganisms that assist in nutrient breakdown and uptake, adding a natural boost to your plants.
Ensuring good drainage is another key factor for growing kale. Poorly drained soil can lead to root rot and other harmful conditions. To improve drainage, consider raised beds or amend heavy clay soils with additional compost or sand. The goal is to create a loamy texture that supports both moisture retention and efficient water runoff.
Paying attention to these fundamental aspects—pH balance, organic enrichment, and drainage—sets the stage for a successful kale harvest. Proper soil preparation is the cornerstone of healthy, vigorous plants, and taking these steps early on will yield bountiful results.
Planting Kale: Seeds vs. Transplants
When it comes to planting kale, two primary methods are usually considered: direct seeding and transplanting seedlings. Each approach has its own set of advantages and considerations. Whether you choose to plant kale seeds directly into the ground or start with young plants, following the correct steps will ensure a bountiful harvest.
If you opt for direct seeding, you’ll find that kale is quite forgiving. To begin, select a well-drained, fertile soil enriched with organic matter. Sow the seeds at a depth of approximately 1/4 to 1/2 inch. Space them about 1 inch apart within rows that are 12 to 18 inches apart to give your kale enough room to grow. As the seedlings emerge and develop, thin them out to maintain a spacing of 8 to 12 inches between plants. This allows adequate air circulation, reducing the risk of disease and promoting robust growth.
Transplanting seedlings is another effective way to grow kale, especially if you’re keen on getting a jump-start on the season. Begin by sowing seeds indoors about 4 to 6 weeks before the last expected frost. A propagator or a simple seed-starting tray works well for this purpose. Keep the seedlings in a warm area with plenty of light. Once they have grown to a sturdy height of 4 to 6 inches and developed a couple of true leaves, they are ready for the transition outdoors.
The hardening-off process is crucial when transplanting kale seedlings. Over a period of 7 to 10 days, gradually expose the young plants to outdoor conditions to acclimatize them. Start by placing the seedlings in a shaded area for a few hours each day, incrementally increasing their exposure to sunlight and cooler temperatures. Once hardened off, transplant the seedlings into the garden, spacing them 12 to 18 inches apart. Water them thoroughly after planting to ensure they establish well.
Whether you are a novice or an experienced gardener, understanding these planting methods can greatly aid in successfully growing kale. By following these guidelines, you set the stage for a lush and healthy kale crop.
Caring for Kale Plants
Proper day-to-day care is essential for growing healthy kale plants. One of the key aspects of caring for kale is maintaining a consistent watering schedule. Kale requires ample moisture, particularly during prolonged dry periods. To ensure your plants receive adequate hydration, it is advisable to water them deeply at least once per week, and more frequently if the weather is particularly hot and dry. The goal is to keep the soil consistently moist but not waterlogged, which can lead to root rot.
Applying a layer of organic mulch around your kale plants can significantly benefit their growth. Mulching helps retain soil moisture by reducing evaporation, keeping the root zone cool, and suppressing weeds that compete for nutrients and water. Organic options like straw, grass clippings, or compost are excellent choices, as they also contribute to soil fertility as they decompose. A mulch layer of about 2-3 inches is recommended, ensuring that it does not touch the stems directly to prevent rot.
Weeding is another crucial aspect of kale care. Weeds compete with your plants for nutrients, water, and light, and can hinder the growth of your kale. Regular weeding, ideally every few days or once a week, will keep the area around your plants free of unwanted competition. Utilizing a hoe or hand weeder can make this task easier and more effective.
Thinning is an often-overlooked step but is vital for promoting the healthy growth of kale plants. Crowded plants suffer from reduced airflow and increased competition for resources, which can lead to disease and stunted growth. When seedlings are about 3-4 inches tall, thin them to about 12-18 inches apart. This spacing allows each plant to receive adequate light, nutrients, and air circulation, leading to more robust and productive growth.
By adhering to these guidelines, you will ensure that your kale plants remain healthy and productive throughout the growing season. Consistent watering, mulching, weeding, and thinning will optimize growing conditions, allowing you to enjoy a bountiful kale harvest.
Pest and Disease Management
Pest and disease management is a crucial step in successfully cultivating kale. This leafy green is susceptible to a variety of pests, including aphids, cabbage worms, and flea beetles, as well as diseases like powdery mildew and black rot. Effective management involves a blend of preventive strategies and both organic and chemical control methods.
Aphids, small sap-sucking insects, often appear in clusters on the undersides of leaves. They can cause significant damage, leading to curled, yellowing leaves. Cabbage worms and flea beetles are also common culprits; these pests chew holes in the leaves, affecting the overall plant health. Powdery mildew, characterized by a white, powdery substance on leaves, can stunt growth and reduce yields, while black rot causes yellowing and wilting of kale leaves.
Organic control methods are often preferred for their environmental benefits. Introducing natural predators like ladybugs can help manage aphid populations. For cabbage worms, handpicking the larvae and using Bacillus thuringiensis (Bt), a microbial insecticide, can be effective. Neem oil serves as a broad-spectrum organic pesticide, useful against both aphids and flea beetles. To combat powdery mildew, a solution of baking soda and water can be sprayed on infected plants, while copper-based fungicides are an option for more severe cases.
Chemical pesticides and fungicides should be considered a last resort due to their potential impact on beneficial insects and the environment. If necessary, use these substances sparingly and in accordance with manufacturer instructions to minimize harm.
Preventive measures also play a vital role in pest and disease management. Crop rotation helps to break the life cycles of pests and pathogens. Companion planting with species like nasturtiums or marigolds can repel harmful insects. Additionally, row covers offer a physical barrier, protecting kale from pests while allowing sunlight and water to pass through.
Monitoring your kale plants regularly is essential. Early detection allows for timely intervention, preventing minor issues from becoming significant problems. Regularly inspect leaves, stems, and soil to ensure a healthy, thriving kale crop.
Harvesting Kale
Knowing the right time to harvest kale is crucial for optimizing both its taste and nutritional value. There are several indicators that your kale is ready for harvest. Generally, you should look for leaves that are of a rich, full color and around the size of your hand. For mature kale, the leaves should be firm and slightly waxy to the touch. Baby kale, on the other hand, is ready for harvesting when the leaves are still tender and small, usually just a few inches in length.
The technique for harvesting kale is straightforward yet essential for the plant’s continued productivity. When picking mature leaves, start from the bottom of the plant and work your way up. Gently snap the leaves off near the stem, making sure not to damage the central bud where new leaves grow. For baby kale, use a pair of sharp scissors to cut the leaves about an inch above the soil. This promotes regrowth and allows for multiple harvests throughout the growing season.
Mature kale leaves have a robust, earthy flavor, making them ideal for soups, stews, and kale chips. Baby kale, with its softer texture and milder taste, is perfect for fresh salads and smoothies. These culinary differences make both stages of growth valuable in the kitchen, offering versatility to your meals.
To extend your harvest season, consider succession planting. This involves planting kale seeds at intervals of two to three weeks, ensuring a continuous supply of fresh leaves. Additionally, protecting your kale plants from frost can prolong their productivity. Use row covers or mulch to shield the plants from extreme cold, as frost can sweeten kale but also damage the leaves if severe.
With these tips, you’ll be well-equipped to harvest kale efficiently, enhancing both your garden’s productivity and your culinary repertoire. Whether you prefer the hearty taste of mature kale or the delicate flavor of baby leaves, proper harvesting techniques will ensure you get the most out of your kale plants.
Using and Storing Kale
Once your kale has been harvested, the key to maximizing its flavor and nutritional value lies in effective usage and storage. Freshly picked kale can be incorporated into a variety of dishes, from smoothies and salads to soups and stews. One popular way to enjoy kale is in a crisp, refreshing salad. Simply massage the leaves with a bit of olive oil to soften them before adding other ingredients like cherry tomatoes, avocados, and nuts. For a quick and nutritious boost, blend fresh kale into your morning smoothie with fruits such as bananas and berries, and a splash of almond milk.
If you have an abundance of kale, freezing is an excellent way to preserve it for future use. Start by blanching the leaves in boiling water for two to three minutes, then promptly transfer them to an ice bath to halt the cooking process. Once cooled, pat the leaves dry and store them in airtight freezer bags. This method helps retain the kale’s nutritional value and makes it convenient to add to meals throughout the year.
Dehydrating kale is another versatile preservation technique. By using a food dehydrator or a low-temperature oven, you can create crispy kale chips—an excellent, healthy snack. Before dehydration, season the leaves with your choice of spices for added flavor. Store the dehydrated kale in airtight containers, keeping them in a cool, dark place to ensure maximum shelf life.
Proper storage techniques are crucial for maintaining the quality of your homegrown kale. Fresh kale should be kept in the refrigerator, ideally in the crisper drawer, to maintain its freshness. Place the unwashed leaves in a plastic bag with a damp paper towel to prolong their shelf life. Under optimal conditions, fresh kale can stay crisp for up to a week. For prolonged storage, rely on freezing or dehydration to ensure your kale retains its rich nutritional profile and robust flavor.


GIPHY App Key not set. Please check settings