
Introduction to Growing Radishes
Radishes are an excellent choice for both novice and experienced gardeners due to their versatile growing conditions and swift growth cycle. One of the primary advantages of cultivating radishes is their ability to mature rapidly, often in as little as 25 to 30 days from planting. This quick turnaround makes them particularly appealing for those who seek immediate rewards in their gardening endeavors.
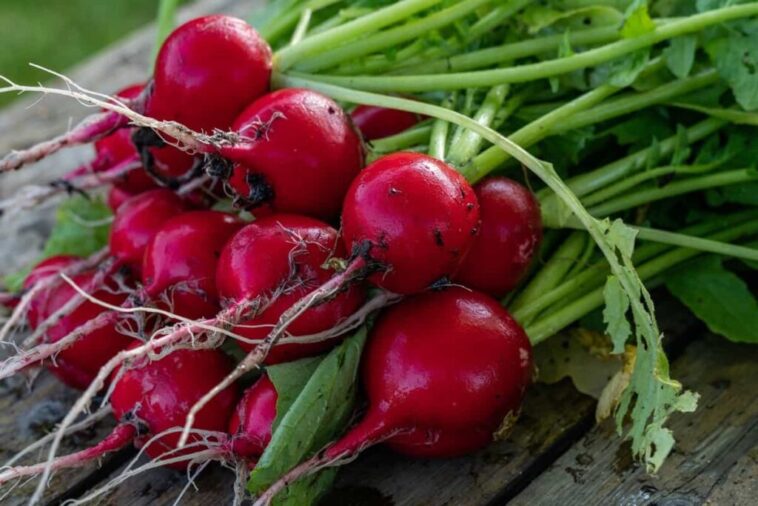
Furthermore, radishes come in a variety of types, ranging from classic red globe radishes to elongated and colorful varieties like the French Breakfast or the striking watermelon radish. This diversity not only adds aesthetic appeal to your garden but also enriches your culinary experiences with their unique flavors and textures.
Adding fresh radishes to your garden offers numerous benefits. Radishes are rich in essential nutrients such as vitamin C, potassium, and dietary fiber, making them a healthy addition to your diet. Moreover, they’re relatively low-maintenance and can be planted in small spaces, including containers and window boxes, making them accessible for those with limited gardening areas.
Whether you are new to gardening or have years of experience, growing radishes can be a gratifying and relatively simple venture. Their fast growth cycle and varied types allow for continuous and engaging cultivation throughout the growing season. By integrating radishes into your home garden, you not only enjoy the tangible rewards of fresh produce but also gain the invaluable experience of nurturing plants from seed to harvest.
Choosing the Right Varieties of Radishes
When embarking on the journey of growing radishes, one of the fundamental steps is choosing the appropriate variety. Radishes can broadly be categorized into three types: spring radishes, winter radishes, and specialty varieties. Understanding the unique characteristics of each type will help you make an informed decision suitable for your climate, soil conditions, and personal preferences.
Spring radishes, also known as salad radishes, are the most common variety you’ll encounter. These radishes mature quickly, usually within three to four weeks, and are best suited for cooler temperatures in the spring and fall. They have a crunchy texture and a mildly spicy flavor, making them ideal for fresh salads. Varieties such as ‘Cherry Belle’ and ‘French Breakfast’ are popular choices among gardeners.
Winter radishes, in contrast, take longer to mature, often requiring up to 70 days. These radishes are planted in late summer to early fall and are harvested before the first frost. They are generally larger, denser, and have a more robust flavor compared to their spring counterparts. Varieties like ‘Daikon’ and ‘Black Spanish’ exemplify winter radishes, known for their extended storage capabilities and versatility in culinary applications.
Specialty radishes cater to more specific tastes and uses. These include varieties such as ‘Watermelon Radish’ with its striking pink internal color, and ‘Easter Egg’ radishes, which offer a variety of colors in a single planting. Specialty radishes can add visual appeal and unique flavors to your dishes but require more tailored growing conditions.
Selecting the right radish variety involves considering your local climate. Spring radishes thrive in cooler environments, whereas winter radishes can endure slightly colder temperatures. Soil type also plays a significant role; radishes prefer loose, well-draining soil rich in organic matter. Evaluate your gardening space and choose a variety that aligns with the growing season and your culinary preferences to ensure a successful radish harvest.
Preparing the Soil and Site Selection
Growing radishes successfully begins with selecting the right spot in your garden and preparing the soil meticulously. For optimal growth, radishes require loamy soil with a pH level between 5.8 and 6.8, ensuring it is neither too acidic nor too alkaline. The soil should be well-drained to prevent waterlogging, which can cause root rot and other related issues. Sandy soils or those rich in organic matter often provide the best results. Avoid compacted or clay-rich soil, which can impede root development and lead to misshapen radishes.
Begin soil preparation by thoroughly tilling the area where you plan to plant your radishes. Tilling helps to break up any compacted soil layers, thus improving aeration and root penetration. Add a generous amount of compost or well-decomposed organic matter to the soil. This organic addition not only enriches the soil with essential nutrients but also enhances its texture and drainage capabilities. Aim for approximately 2-3 inches of compost worked into the top 6-8 inches of soil.
Proper drainage is crucial, so evaluate your garden’s landscape to ensure water does not accumulate or stagnate. If necessary, consider employing raised beds or creating mounds to elevate the planting area, thereby facilitating better water run-off. Additionally, a light application of a balanced fertilizer, such as a 10-10-10 blend, can be beneficial. Follow the recommended rates to avoid over-fertilization, which might lead to excessive leaf growth at the expense of root development.
The chosen site should receive at least 6 hours of direct sunlight daily, as radishes thrive in sunny conditions. Make sure the area is shielded from strong, prevailing winds, which can damage the delicate seedlings. A location adjacent to a windbreak, such as a fence or taller plants, can provide this protection. By paying close attention to these factors, you create an ideal environment for radishes to grow healthily and vigorously.
Planting Radish Seeds
Growing radishes successfully begins with the correct planting of radish seeds. The first step involves selecting the appropriate time of year for sowing. Radishes thrive best in cool weather, making spring and fall the ideal seasons. For early spring planting, sow radish seeds two to three weeks before the last expected frost. For a fall harvest, plant them four to six weeks before the first anticipated frost.
When preparing to plant radish seeds, proper spacing and depth are crucial. Sow the seeds at a depth of about half an inch (1.25 cm) into the soil, ensuring that the spacing between seeds is around one inch (2.5 cm). This spacing allows sufficient room for the radish roots to develop without overcrowding. Once the seedlings emerge, thin them out so that the remaining plants are spaced around two inches (5 cm) apart to give each plant adequate room to grow.
The soil plays a significant role in the germination and growth of radishes. Aim for a loose, well-draining soil with a pH level between 6.0 and 7.0. This pH range ensures the seeds receive the nutrients they need to grow robustly. Keeping the soil consistently moist is essential, especially during the germination period when radish seeds are developing. However, avoid over-watering, which can lead to waterlogging and eventual root rot.
Soil temperature is another vital factor in the successful planting of radish seeds. Radish seeds germinate best in soil temperatures ranging from 50°F to 85°F (10°C to 29°C). If the soil is too cold, germination may be delayed, while excessively warm soil can lead to poor seedling development. By maintaining optimal soil conditions, you pave the way for a healthy and productive radish crop.
Watering and Feeding Your Radishes
Ensuring radishes receive the right amount of water is pivotal for robust growth and healthy yields. These root vegetables thrive in consistently moist soil, which means maintaining an optimal level of hydration is essential. Radishes require about one inch of water per week, so it is advisable to water them regularly to keep the soil evenly moist. However, be cautious to avoid waterlogging, as overly saturated soil can lead to root rot and other fungal diseases.
To strike the right balance, check the soil moisture frequently, especially during dry spells. A good practice is to water radishes deeply but less frequently, encouraging roots to grow downward in search of water. Mulching can also help preserve soil moisture and reduce evaporation, ensuring that the roots do not dry out.
In terms of feeding, radishes are relatively light feeders but do benefit from nutrient-rich soil to achieve the best growth. A well-balanced fertilizer, applied at the time of planting, can provide the necessary nutrients. For an organic approach, well-rotted compost or a light dressing of aged manure can offer a steady supply of nutrients throughout the growing season.
It’s important to recognize and address nutrient deficiencies to prevent stunted growth or poor development. Yellowing leaves may indicate a lack of nitrogen, while purpling could signal a phosphorus deficiency. Potassium shortage may be apparent from poor root development. Tailor your fertilizing strategy based on these symptoms, but always avoid over-fertilizing, which can lead to excessive foliage at the expense of root formation.
Overall, a careful approach to watering and feeding will ensure your radishes grow strong and healthy, producing crisp and full-flavored roots. Observing these guidelines will lead to a bountiful harvest of vibrant radishes, well-equipped to complement any meal.
Thinning and Weeding
Thinning is a critical step in ensuring the healthy growth of radishes. When radish seeds are initially sown, it’s common practice to plant them closely together, knowing that not every seed will germinate. However, once the seedlings emerge, usually within 4-10 days, it’s vital to thin them out to provide adequate space for each plant. Proper spacing minimizes competition for nutrients, water, and sunlight, which are essential for the development of large, healthy radishes.
To thin radish seedlings correctly, first wait until they have developed at least a couple of true leaves. Gently pull out the weaker or crowded seedlings, leaving about 1 to 2 inches between the remaining plants. This spacing ensures that each plant has enough room to grow to its full potential. Be careful during this process to avoid disturbing the roots of the remaining plants, which could hinder their growth. Thinning should ideally be done when the soil is moist, as this makes it easier to remove seedlings without damaging the others.
Effective weeding is another crucial element in the cultivation of radishes. Weeds compete with radish plants for essential resources such as nutrients, water, and sunlight. To ensure your radishes thrive, it’s imperative to keep the planting area free from weeds. Regularly inspect your garden and remove weeds as soon as they appear. Manual weeding can be done carefully by hand, ensuring you pull the weeds out by the roots to prevent them from regrowing.
Mulching can also be a beneficial technique in your weeding strategy. Applying a layer of organic mulch around the radish plants helps suppress weed growth, retain soil moisture, and regulate soil temperature. This practice not only reduces the time spent weeding but also creates a more favorable growing environment for your radishes. By diligently thinning and weeding your radish bed, you substantially increase the chances of a bountiful and healthy harvest.
Dealing with Pests and Diseases
Growing radishes can be a rewarding endeavor, but it is important to stay vigilant against common pests and diseases that may threaten your crop. Among the most detrimental pests are root maggots, flea beetles, and various fungal infections. Addressing these challenges effectively requires a combination of monitoring, preventative measures, and treatment options.
Root maggots, the larvae of certain fly species, burrow into radish roots causing significant damage. Signs of infestation include wilted, stunted plants and visibly tunneled roots. Organic control options include deploying beneficial nematodes or applying diatomaceous earth around the plants to deter maggot activity. Ensuring proper soil drainage and using floating row covers can also minimize the risk of root maggot infestations.
Flea beetles are small, hopping insects that chew small holes in radish leaves, which can impede plant growth and reduce yields. To manage flea beetle populations, consider interplanting radishes with companion plants like basil or marigolds, which repel these pests. Additionally, using sticky traps or neem oil sprays can help control minor infestations. For severe cases, insecticidal soaps or spinosad-based treatments are effective options.
Fungal infections, such as downy mildew and damping-off, pose a serious threat to radish plants, particularly in damp, overcrowded conditions. To prevent these diseases, practice crop rotation, ensure adequate spacing between plants, and water in the morning to reduce leaf moisture. Fungicidal treatments, such as copper-based sprays, can be used if symptoms persist. Maintaining a healthy garden ecosystem by enriching the soil with compost and beneficial microbes can also bolster the plants’ natural defenses.
Implementing a proactive approach to pest and disease management, combined with the strategic use of companion planting, can greatly enhance the resilience and productivity of your radish crop. Regularly inspecting plants and applying organic or appropriate chemical treatments when necessary will ensure that your radishes grow strong and healthy, yielding a bountiful harvest.
Harvesting and Storing Radishes
Timing is crucial when harvesting radishes to ensure optimal flavor and texture. Radishes are typically ready to be harvested within 3 to 4 weeks of planting, depending on the variety. It’s essential to monitor the size of the radish roots; ideally, they should be about 1 inch in diameter. At this point, you can gently push back some soil around the base to check the size before fully committing to pulling them.
The best time to harvest radishes is during the early morning or late afternoon when temperatures are cooler. To harvest, firmly grasp the leaves just above the radish root and gently pull upwards. If the soil is compacted, it might be helpful to use a garden fork to loosen the soil around each radish before pulling. This method minimizes the risk of damaging the roots, maintaining their integrity and ensuring they remain crisp.
Once harvested, it’s crucial to remove the leafy tops immediately, as they can draw moisture away from the radish root, causing it to become soft and lose its crunch. Simply cut the greens about half an inch above the root. While retaining a little stem can add visual appeal, it’s equally practical for handling the radish without causing any bruising.
For short-term storage, radishes can be stored in the refrigerator. Place them in a plastic bag with a slightly damp paper towel to maintain humidity. This method can keep radishes fresh for up to two weeks. For longer-term storage, radishes can be placed in a root cellar or another cool, dark place. An alternative method involves placing the roots in a container filled with sand, which helps to retain their firmness and flavor for several months.
In summary, harvesting radishes at the right time and using proper storage techniques are crucial for preserving their taste and texture. Implementing these steps will ensure that your radishes remain a delicious, healthy addition to your diet all year round.


GIPHY App Key not set. Please check settings